Google Analytics is a free service from Google for analysing the behaviour of visitors to websites and applications. This is an essential tool for website owners and their web designers as it can provide huge insights into the performance of a website.
With Google Analytics, you can track:
- Where visitors come to the site from — whether from search engines (Organic traffic), paid advertising such as Google Adwords, links from other websites, social networks, or directly — by typing the site URL in the browser address bar;
- What pages were visited, how much time the visitor spent on each page and the site as a whole, and what they did there;
- What information visitors recommended to friends using the social networks/sharing buttons;
- The geographic location of visitors (identified by IP-address);
- The device settings the users use for browsing the site (this tells us whether the device used to access the website was a mobile device or computer, what screen resolution etc);
- The operating system;
- The name and version of the web browser.
In addition, Google Analytics sends cookies to the browser to identify the visitor every time they open the site.
Google Analytics will help you to know and understand:
- How many users visited your site and for what period of time;
- What sources bring you the maximum number of visitors;
- in what regions your site is the most popular;
- What pages are the least popular, and why visitors leave them;
- Whether users perform expected actions like purchases, orders, registration, etc.
 Registering an account
To start using Google Analytics, you need to register for the service and get your Google account. Follow these steps:
- Go to the main Google Analytics Page https://www.google.co.uk/analytics/. Click Login or Register – if you don’t already have an account, it doesn’t matter which.
- To use the service, you will need a Google account. If you don’t have one yet, please create one. If you do, enter your user name and password.
- When you visit the service for the first time, you will see the Welcome page. Click the Register button.
- You can track a website or mobile application. In any case, you need to specify:
Account name — in order not to get confused if you have many of them. You can track multiple sites on the same account at once. You can create up to 100 Google Analytics on the same Google account.
The website or application name — in order to simplify navigation, if you have many of them.
URL — only for websites.
Industry — think about which category is the closest to you. In the future, you will be able to compare your performance with the industry average. More selected categories do not influence anything.
Time zone — to get reports arrive at the suitable time, and not very late at night.
Sharing settings — you can allow or deny Google to use your statistics for their own purposes. The service collects information anonymously, so do not worry — no one will know your conversion and attendance.
When everything is ready — click on Get Tracking ID.
- Read the terms of the agreement and accept it.
After accepting the license agreement, your account will be immediately created.
Connecting the website to the service
In order to allow Google Analytics to collect data about your site, you need to install a special counter. This is a script that is loaded on every page, and it collects statistics and sends it to Google.
After registration, you will be issued a unique identifier and tracking code, which must be placed on all significant pages of the site that you want to track with Google Analytics. After that, the service will start collecting the statistics.
How to add the Google Analytics tracking code to the site?
There are four ways to connect the counter:
Method 1.
Insert the script into the site code. If you want the analytics to work on all pages, put the counter in header or footer.
Copy the code from the “Tracking Web Sites” section.
Now open your site code and paste the script there. It is the best to put it in the header inside the…tag, or footer inside
tag.
Method 2.
Create a file analyticstracking.php and put a script there. Add the following line of code to all website pages:
Method 3.
Through Google Tag Manager. You connect the container script to the site. After that, you can put several scripts at once in this container. As a result, you do not need to open the code every time and change something there.
Method 4.
Via a plugin for your website CMS. You just need to enter your account ID in Google Analytics.
Select one of the methods and connect Google Analytics to your site. Statistics may not be displayed immediately. Do not worry. It can take up to several hours.
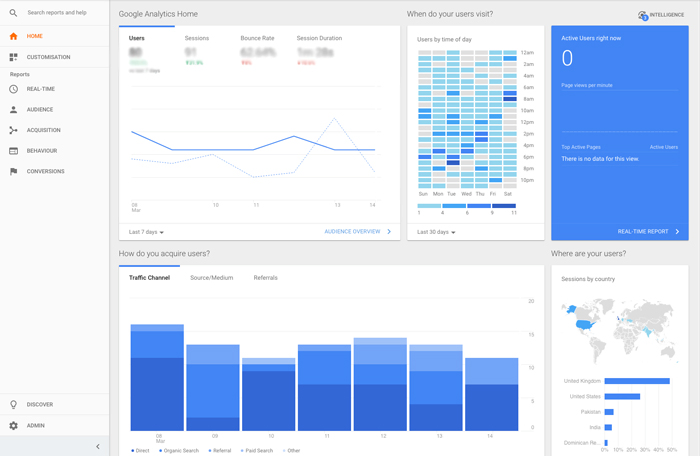 The Google Analytics Interface
The Google Analytics home page displays a list of connected websites and the main statistics for each of them:
- sessions;
- average session duration;
- bounce rate;
- the conversion rate (the ratio of the number of site visitors who performed the actions you need to the total number of visitors).
Reports
Google Analytics has a number os sections which provide detailed information about a particular statistic like where your traffic came from or what users did on your site. There are a number of views which are preconfigured, but any combination of data can be compiled into a custom report. The main headings are:
Acquisition in the side menu, you will get all attendance reports. You can configure the report view, delete unnecessary reports and create the new ones. Any report can be sent by email, exported to PDF and displayed to other users. If you require the current site statistics, click the Real-time button in the sidebar. The data on this tab can be monitored by minutes.
The Audience section will show detailed information about the users coming to the site. Here you will also find out what devices the visitors use to enter your website, how often they return and how much they are interested in your site (how much time they spend on it, how many pages they open).
The All Traffic section provides the most detailed information about the visitor’s location and what requests they use. To track their path from the search engines, as well as the conversion of your goals, you must link your Google Analytics account with AdWords. This will allow you to view AdWords reports from the Google Analytics interface and vice versa — to import Analytics data into your AdWords account.
The Behaviour section displays the information about how the visitors interact with the content of the site. The statistics collected here will let you understand how useful are your materials.
The Conversions section will display the number of visitors performing valuable actions like buying goods.
Settings
The Google Analytics Settings page is intended for configuring the service. Here you can view them, divide into categories and import from the gallery.
Admin
The Admin page contains account settings and statistics collection management tools. It is divided into three sections: Account, Property, and View.
The tools in the Account section allow you to set the filters for viewing Google Analytics data, and to control access to your statistics for other users.
The Property section contains tools for configuring the connected sites and product linking to other Google products like AdWords, AdSense, Webmaster Tools and others.
In the View section, you can find tools for the detailed configuration of the statistics collection: user management, filters, goals, user management, and many others.
Google Analytics is an amazing service with a huge array of features, and the best part is that it is free! Careful study of Analytics data can and should steer your web strategy to increase both visitor numbers and conversions.
If you like what you hear, but don’t know where to start, please contact us. We can help with everything from account setup to advanced monthly reporting.
Related reading: Proven Ways to Boost Your Website Traffic in 2026, Content Creation Is Harder Than It Looks — Here’s How to Actually Do It Right.